How to Remove an Old Honeywell Thermostat from the Wall (Prep & Process)
If you own your home, at some point you’ll need to replace the thermostat. Either yours will wear out, or you’ll decide it’s time for an upgrade. Either way, chances are it’s not something you’ve ever done before, but you might be surprised to find out that it’s actually a fairly simple process when you’re switching out comparable devices. If you’re ready to roll up your sleeves and do it yourself, start by considering how to remove an old Honeywell thermostat from the wall.
To remove an old Honeywell thermostat, gather a Phillips head screwdriver, a very small flat-head screwdriver, and a bit of painter’s tape. Switch off the breaker that supplies power to the HVAC unit – the thermostat is battery-powered so it will still be on. Remove the cover, and the wires, labeling each with the tape. Remove the backing plate.
Keep reading to learn the ins and outs of removing your old thermostat, including tools, prep, and what to do once the old one is off.
How to remove a Honeywell thermostat from the wall
The typical lifespan of a household thermostat is 10 years, although you may choose to replace yours before it wears out. Newer thermostats tend to offer improved energy efficiency and some even allow you to monitor or control your home’s temperature from your smartphone.
Before you can upgrade, you’ll need to remove the existing thermostat. Start by gathering the required tools and turning off the power to the HVAC unit. After that, remove the faceplate. Carefully label and disconnect all the wires, then unscrew the wall plate.
Despite the range of Honeywell thermostats available, most of them have the same basic construction; that being said, if it required professional installation, you’ll probably want a professional to remove it.
Do not restore power to the HVAC until you’ve connected a replacement!
Did you know that clearing the schedule on your programmable Honeywell thermostat can also help improve heating and cooling efficiency?
Before you replace your thermostat, you might want to confirm you’ve got a problem with the existing one. If it’s not cooling properly, I’ve got seven troubleshooting steps to try before replacing your thermostat. Maybe it’s costing too much to heat the house? Have you confirmed the auxiliary heat is turned off?
How do I disconnect my Honeywell thermostat?
Disconnecting a Honeywell thermostat is a fairly simple process, but one without a lot of room for error. I’d recommend it for intermediate DIYers or beginners with an eye for detail.
Before touching your thermostat, you’ll need to gather the appropriate tools, turn off the power to your HVAC system, and know what you’ll be doing once the thermostat is off the wall. Only then should you remove the cover plate. Label and disconnect all the wires before removing the wall plate.
Think you’re ready? Read through all the steps in detail before getting started!
Tools
As with most home repair projects, planning ahead is almost as important as the actual execution.
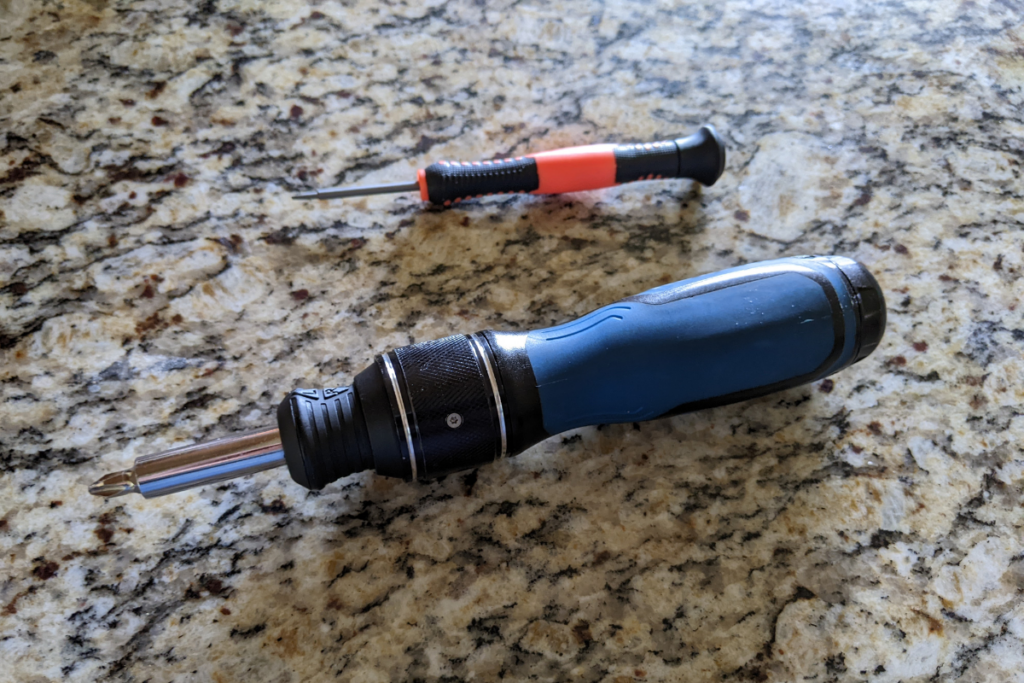
To remove a Honeywell thermostat from the wall, you’ll need:
- Very small flathead screwdriver for disconnecting the wires
- Medium Phillips head screwdriver for disconnecting the wall plate
- Painter’s tape for labeling the wires
- Phone for documenting what the wires look like before you disconnected them
Don’t get started yet! Keep reading to find out the next step.
Prep
After gathering all your materials, take a minute and look to the future.
Before removing your old thermostat, have the “next step” in mind. If replacing the device, have the new one ready to go. Make sure you’ve read over all the installation instructions and have all the necessary equipment in hand.
Almost there!
The last thing to do before removing your old thermostat is to turn off the power to the HVAC system. First, turn off the power at the unit if possible (if not, wait until it’s not running). Turn off the power at the breaker as well.
Turning off the power at the breaker ensures there’s no electricity in the line – meaning no electrical accidents on the horizon. Turning it off at the unit helps protect it from damage when the power is cut or restored. Both are necessary.
Disconnect
Now it’s time to disconnect your old Honeywell thermostat!
To remove an old Honeywell thermostat from the well, follow these steps carefully:
- Move the switch to the OFF position and remove the faceplate.
- Take a picture of the inside of your thermostat for reference during the new installation.
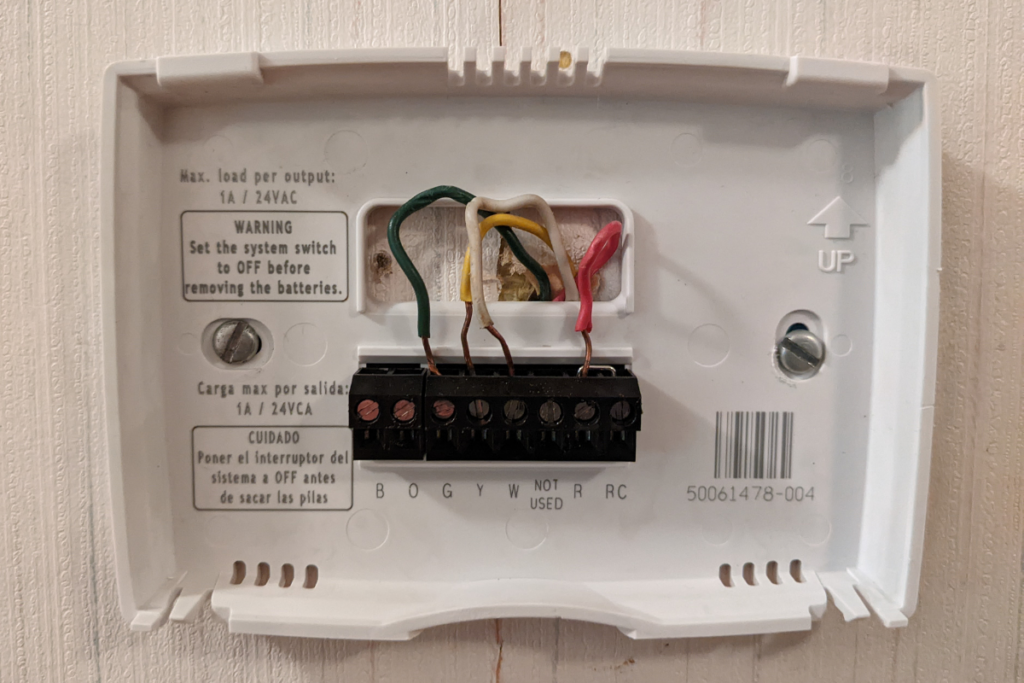
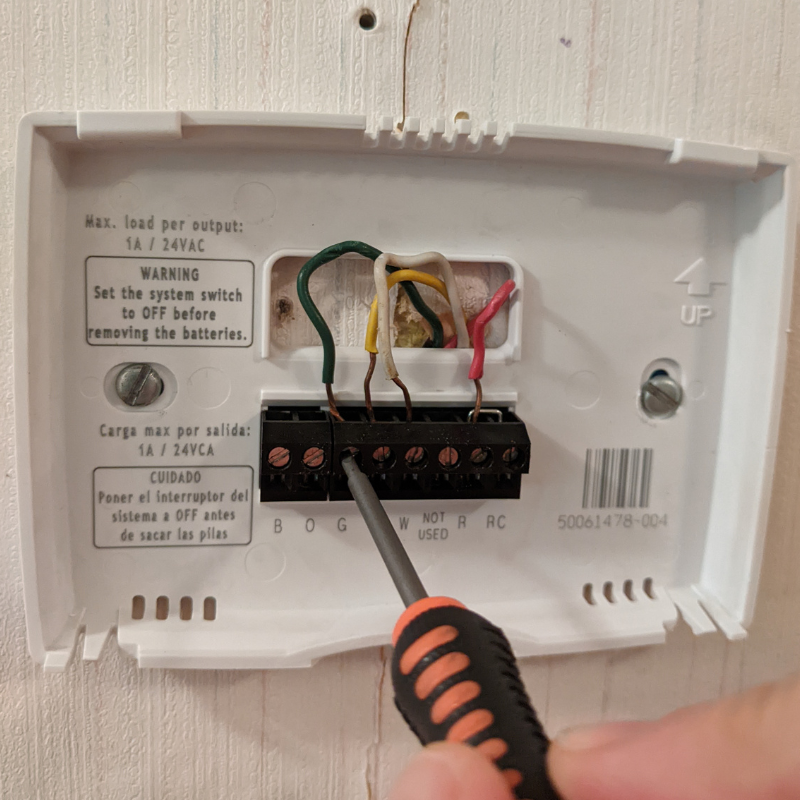
- Locate the terminal (the line of wires inside the thermostat).
- Use the small flat-head screwdriver to loosen the leftmost (W) screw. Remove the wire and use a bit of painter’s tape to label the wire W.
- Release and label all the remaining wires in the same manner. There may be only two wires, or there may be a wire in every slot, depending on your thermostat.
- Use the larger screwdriver to remove the screws from the wall plate.
- Pull the wall plate off, being careful not to yank on the wires. If it sticks to the wall, don’t force it off; use a boxcutter or small flat blade to pry the plate off the wall.
Top tip: If there is a small glass capsule inside your thermostat, you’re dealing with liquid Mercury and will need to take particular care with handling and disposal.
What do the wire colors mean?
You should take care to label the wires as you remove them and to take a picture of the original setup, but there are some measures in place if you forget.
Most modern thermostats will have five color-coded wires: white, red, yellow, green, and blue. For the most part, they will be connected to the letters that coordinate with their colors (the blue is “c” for cyan).
| Wire Color | Label | What does it control? |
|---|---|---|
| White | W | Heating |
| Red | R | 24V power |
| Yellow | Y | Cooling |
| Green | G | Indoor fan |
| Blue | C | Common wire |
Top tip: These colors are standards, but not always held to. When in doubt, you should connect the wires to match the original!
Replace and/or repair
Now that you’ve removed your old thermostat, what’s next?
If you’re replacing the thermostat with the same model or a very similar one, repeat the removal process in reverse. For upgrades, consult the installation instructions for the new thermostat.
In some cases, the new thermostat will be a different size or shape. In that case, you’ll be looking at another DIY project: repairing your wall!
Note: some Honeywell thermostats – particularly the smart ones – require compatible wiring and professional installation. Make sure you study the installation instructions carefully!
How do I take the cover off a Honeywell thermostat?
Depending on the model of your thermostat, there are a couple of different ways the cover may come off. No matter which way you’re trying, move the power switch to the OFF position.
Most Honeywell thermostats can be removed simply by pulling the front off the base plate. If you haven’t taken the cover off before, check around the thermostat for tabs, clips, or finger holds. Forcing the cover off can cause damage if there is a trigger release.
How much does it cost to have a new thermostat installed?
Forbes reports that the average cost to have a thermostat installed is $200.
The exact cost will depend on the complexity of your system, the number of changes required, and the hourly rate of the technician. This cost does not include the cost of the thermostat itself.
How do you change the batteries in a Honeywell thermostat?
To change the batteries in your Honeywell thermostat, remove the front of the thermostat and locate the batteries. For most models, they will be obviously located behind the display with a debossed indication of which way the battery should be inserted.
Check out this article if your Honeywell thermostat isn’t working after you change the batteries.
Final thoughts
Removing a Honeywell thermostat is a relatively simple process that requires careful planning.
Make a plan, especially regarding what you’ll be doing once the thermostat is removed. Gather your tools, including a Phillips head screwdriver, a very small flathead, some tape for labeling the wires, and your phone for documenting the wire placement.
Remove the wires from the thermostat terminal, marking which one came from where.
Unscrew the base plate and remove it from the wall.
Let Us Know How We’re Doing!
Did this expertly prepared resource answer your question?
Do you have another question about home maintenance, home improvement projects, home appliance repair, or something else?
Get more information, send in questions and keep the discussion going by contacting the I’ll Just Fix It Myself company customer service team at at 1-800-928-1490 or Email us at [email protected]