Carrier Home AC Thermostat Not Cooling: 9 Quick Fixes for Common Issues
In our modern comfort-driven world, central heating and cooling systems have taken center stage. Much like our dedication to finishing an entire TV series in one weekend, we’ve come to rely heavily on these AC systems, particularly when we’re situated in those in super hot or humid regions of the US.
If you are struggling with a Carrier thermostat that isn’t cooling (or even working at all) there are some fairly quick and easy steps to take before calling in a professional.
When your Carrier thermostat is active, but your AC isn’t blowing cold, first wait it out for about five minutes to give the unit time to cycle and switch the cooling back on. If waiting doesn’t work, reset the Carrier thermostat, replace the batteries, inspect the AC filters, check the furnace door switch, and inspect your AC coils.
If all else fails, it’s probably wise to dial up a professional.
Now, let’s delve deeper into the nitty-gritty of troubleshooting that lukewarm Carrier thermostat and how to handle an HVAC that’s acting more like a heater than a cooler.
Carrier Thermostat is On But Not Cooling
For many of us, indoor plumbing and central heating and air conditioning aren’t just conveniences – they’re as essential as that morning cup of joe is to, well, nearly everyone! Ever had those moments when your thermostat acts like it’s in dreamland, looking all active but not pushing out that cool breeze?
Before you dash for the phone to call an HVAC guru, relax for a moment, perhaps with a comforting drink in hand, and do a quick once-over of your Carrier thermostat. A little bit of DIY troubleshooting might just save you some money, precious time, and spare you from a sweaty situation.
To help you on this little detective adventure, it’s good to know a thing or two about your HVAC unit. Get acquainted with where the air filters are, how often you’ve been changing them, and pinpoint where the main unit resides. Keeping on top of regular maintenance ensures your HVAC gets to celebrate many birthdays, all while keeping you comfortable!
Troubleshooting a Carrier Thermostat
Your thermostat should always be placed in a central location that doesn’t experience extreme temperature changes because it senses the ambient temperature and gives the command to the heater or AC to maintain a comfortable temperature throughout the house.
But, what if your Carrier thermostat is not cooling properly, even when it is on and set to cool the house?
If your Carrier thermostat isn’t working properly, here are nine steps to fix it up:
- Check your settings
- Be patient (Yes, again!)
- Reset the thermostat
- Change the batteries
- Replace the air filters
- Check the furnace door/power switch
- Inspect the AC coils
- Replace the thermostat
- Call in an HVAC specialist
I’ve tried to arrange these steps from the ‘stroll in the park’ to the ‘climb up the mountain’ ones. But feel free to tackle them in any order you want. Depending on your comfort level, you might want to leap to #8 after changing the batteries. We’re not judging!
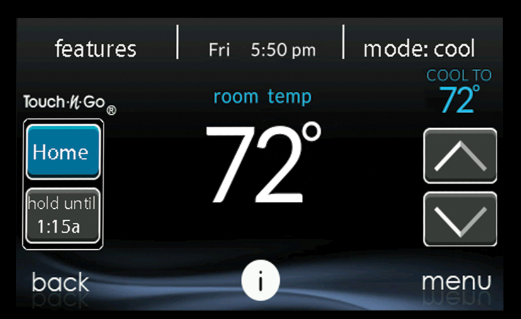
Check Your Carrier thermostat Settings
This might seem as obvious as finding sand on a beach, but hey, sometimes, it’s the most apparent things we overlook. Before you let panic get the best of you, ensure all your settings are right.
On your Carrier thermostat:
- Switch – The Heat – Off – Cool switch should be set to Cool. Fan switch should be on Auto (it runs only when the AC is activated) or On (it circulates air without cooling it).
- Programming – This controls the target temperature based on the day, time, and mode. Double-check to ensure all programmed temperatures match your comfort level and expectations.
- Hold – This function overrides the programmed temperature. It will maintain the new temperature until you manually remove the hold or until the programmed temperature changes. After that, the thermostat will return to its standard schedule.
If reprogramming your Carrier thermostat feels like solving a Rubik’s cube, you can always check out the manufacturer’s instructions or watch some handy online tutorials.
Be Patient
Patience is a virtue, especially when dealing with a thermostat. It displays the current temperature but may not kick-start the AC immediately. You might see that it’s cooling without there being any noticeable temperature change.
Give the thermostat a little time, usually 2-5 minutes, before moving on to the next steps. This little pause will tell you if the thermostat is just on delay mode (in between cycles) or if there is a more serious problem. Delay mode usually lasts about five minutes, but this could vary depending on your thermostat model.
Reset the Thermostat
Resetting a Carrier thermostat involves a straightforward process but may vary slightly depending on the specific model of your Carrier thermostat.
There are three main types of Carrier thermostats and I’ll list the instructions for resetting each one here.
How to reset a Carrier Infinity Thermostat
- Locate the Main Panel: The main interface of the Infinity thermostat is typically a touchscreen.
- Access the Menu: On the main screen, you should see a “Menu” button or icon. Tap on it.
- Find the “Advanced” or “Settings” Option: Once you’re in the menu, navigate to the section that says “Advanced” or “Settings.”
- Locate the Reset Option: Under the advanced or settings menu, you should see an option labeled “Reset” or “Factory Reset.” The specific wording may vary depending on the model.
- Choose the Type of Reset: There might be multiple reset options like “Soft Reset,” “Hard Reset,” or “Factory Reset.” For most minor issues, a soft reset should suffice. However, if you’re facing more significant problems or you want to return the thermostat to its original settings, choose “Factory Reset.”
- Confirm the Reset: The thermostat will likely ask you to confirm your decision since this action can erase specific settings and data. Confirm the reset by pressing “Yes” or “Confirm.”
- Wait: The thermostat will go through the reset process, which could take a few seconds to a minute.
- Reconfigure Your Settings: After the reset, you’ll need to re-enter your desired settings, preferences, and scheduling details.
- Test the Thermostat: Adjust the temperature settings to ensure the thermostat communicates correctly with the HVAC system.
How to reset a Carrier ecobee smart Thermostat
- Access the Thermostat: Approach your Carrier ecobee thermostat. The display should light up when you get close, thanks to its proximity sensor.
- Touch the Screen: Tap anywhere on the screen to wake it up if it’s in sleep mode.
- Open the Main Menu: On the bottom right corner of the home screen, you’ll find a three-lined “hamburger” icon. Tap it to open the main menu.
- Navigate to Settings: Once the menu is open, look for and select “Settings.”
- Go to ‘Reset’ Options: Scroll down within the Settings menu until you find the “Reset” option. Tap on it.
- Choose the Type of Reset:
- Reset All: This will reset your Carrier ecobee thermostat to its factory settings, erasing all your personalized settings.
- Reset Schedule: This will clear any custom schedules you’ve set.
- Reset HomeKit: This will remove any HomeKit configuration if you have it integrated.
- Reset Registration: This will require you to register your device again.
- Wi-Fi Reset: This will only reset your Wi-Fi settings.
- Confirm Your Choice: The thermostat will ask you to confirm your decision. This is a crucial step because some resets (like “Reset All”) will erase your settings. Confirm by selecting “Yes.”
- Wait for the Process to Complete: After confirming, the thermostat will begin the reset process. This could take anywhere from a few seconds to a couple of minutes.
- Reconfigure If Necessary: If you did a complete factory reset, you would need to reconfigure your settings, Wi-Fi, and any other personalizations.
- Test the Thermostat: Ensure that it’s operating correctly and communicating with your HVAC system.
How to reset a Carrier Comfort Series Thermostat
- Access the Thermostat: Approach your Carrier Comfort Series thermostat.
- Open the Cover: If your model has a front panel or cover, gently open or swing it out to reveal the buttons or controls.
- Enter the Settings/Configuration Mode: Depending on the specific model, there may be a “Settings” or “Configuration” button. If so, press it. Some models may require you to press and hold a specific button or combination of buttons.
- Navigate to the Reset Option: Use the arrow or navigation buttons to scroll through the menu until you find the “Reset” option. This might be labeled differently on some models, like “Factory Reset” or “Default Settings.”
- Select the Reset Option: Once you’ve found the reset function, press the appropriate button to select it. This could be an “Enter”, “Select”, or “OK” button, depending on the model.
- Confirm the Reset: Most thermostats will prompt you to confirm that you want to reset to avoid accidental resets. Confirm your decision by selecting the appropriate button or option.
- Wait for the Reset to Complete: Once confirmed, the thermostat will undergo the reset process. Depending on the model and type of reset, this might take a few seconds to a couple of minutes.
- Adjust Settings Post-Reset: After the reset, you’ll likely need to re-enter your preferred settings, such as date/time, temperature preferences, and schedules.
- Close the Cover: If you opened a cover in step 2, gently close it back into place.
- Test the Thermostat: Ensure that your thermostat is working correctly and communicating effectively with your HVAC system.
Remember, always refer to your specific model’s owner manual before attempting to reset the thermostat, as the process may vary.
Here is a video that covers a typical Carrier thermostat reset:
Change the Batteries
The process to change batteries in a Carrier thermostat can depend on the specific model of your thermostat. Keep in mind also that some thermostats are connected directly to a power source in the wall and also have batteries installed as a backup.
However, here are some general steps that apply to many models:
- Turn off your HVAC system: It is recommended to turn off your heating and air conditioning system at the circuit breaker to prevent any short circuits or electrical issues.
- Remove the front cover or body of the thermostat: In most models, you can do this by gently pulling the cover or body straight out towards you. Some models may have a latch or screw that you will need to undo before you can remove the cover.
- Locate the battery compartment: Once the cover is off, look for the battery compartment. It should be easily visible.
- Remove the old batteries: Remove the old batteries from the compartment. Be sure to note which way the batteries were installed (which end was positive and which was negative).
- Install the new batteries: Insert the new batteries in the same orientation as the old ones. Most Carrier thermostats use AA or AAA batteries but check your specific model’s manual to be sure.
- Replace the cover: Once the batteries are replaced, put the cover or body back on the thermostat.
- Turn your HVAC system back on: You can now turn your heating and air conditioning system back on at the circuit breaker.
Remember, always check your specific model’s owner manual for precise instructions on replacing the batteries, as the process can vary between different models. If you can’t find the manual, many are available online on the manufacturer’s website.
Replace Air Filters
The air filters are like the gatekeepers of your HVAC system. If they get clogged with dust and debris, the AC won’t function properly. They should ideally be replaced every 1-3 months.
Ignoring air filter replacements is like ignoring the ‘check engine’ light in your car. You might not see immediate issues, but sooner or later, it will come back to bite you.
Check the Furnace Door/Power Switch
Okay, we’re stepping up a bit. While we’re dealing with the cooling system, sometimes the furnace door or power switch may have a part to play in the malfunction.
Most furnace units have a safety switch that prevents the furnace from running when the door is open. Check to ensure the door is securely closed. Also, ensure the power switch is in the ‘on’ position. You don’t want your HVAC playing hide and seek with the power.
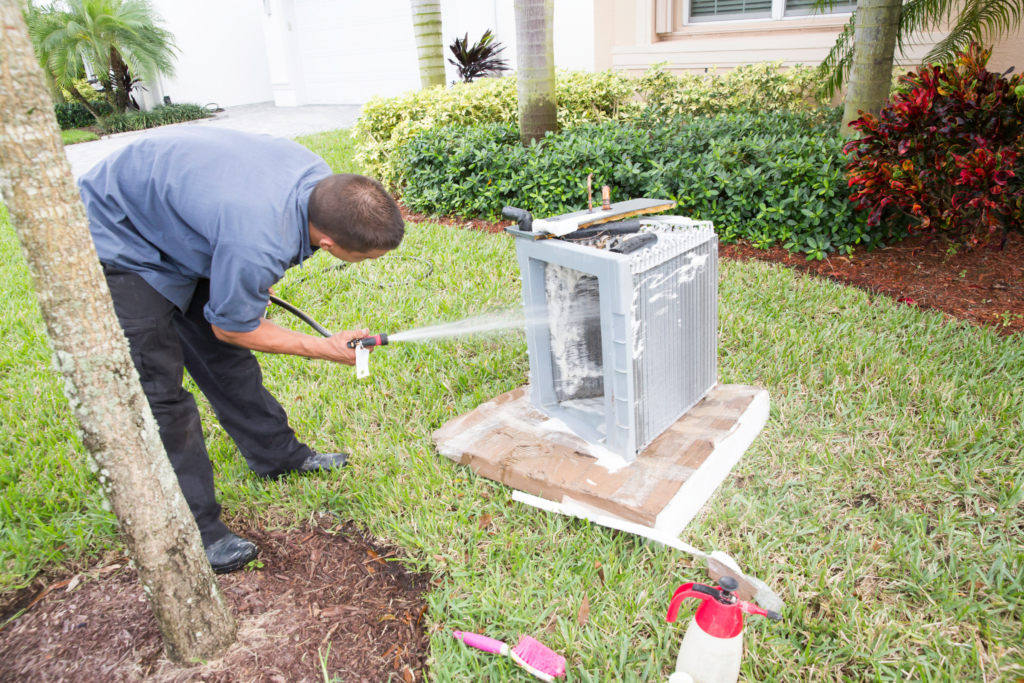
Inspect the AC Coils
Air conditioner coils are responsible for the transfer of heat. The inside coil cools and dehumidifies the air, and the outside coil releases the collected heat outside. If the coils are dirty, the heat transfer process gets disrupted.
Regular cleaning of AC coils can prevent this issue. However, you might want to call a professional if you’re not comfortable cleaning the coils yourself. Some things are better left to the experts.
Replace the Thermostat
Sometimes the best way to fix a problem is to start from scratch. If you’ve followed all the steps and your thermostat still isn’t behaving, it might be time to bid it goodbye.
If you are dealing with the original thermostat that came installed with your Carrier AC system, it might be a great time to upgrade to a smart thermostat that is compatible with your system.
Call in an HVAC Specialist
I know, I know, you wanted to fix this all by yourself, but sometimes we need a little professional help. If all else fails, call an HVAC specialist. You might have a faulty HVAC unit, or there could be a serious electrical issue that needs a professional touch.
The following table summarises these steps:
| Step | Action |
|---|---|
| 1. | Check your settings |
| 2. | Be patient |
| 3. | Reset the thermostat |
| 4. | Change the batteries |
| 5. | Replace air filters |
| 6. | Check the furnace door/power switch |
| 7. | Inspect the AC coils |
| 8. | Replace the thermostat |
| 9. | Call in an HVAC specialist |
In conclusion, if your Carrier thermostat is not cooling, you have several troubleshooting steps at your disposal. If it feels like you’re in a hot desert without a camel, take a deep breath and remember that Rome wasn’t built in a day, nor are thermostat issues always solved in five minutes. Good luck, and here’s to hoping your HVAC system starts playing nice soon!
Let Us Know How We’re Doing!
Did this expertly prepared resource answer your question?
Do you have another question about home maintenance, home improvement projects, home appliance repair, or something else?
Get more information, send in questions and keep the discussion going by contacting the I’ll Just Fix It Myself company customer service team at at 1-800-928-1490 or Email us at [email protected]