How to Caulk Gutters: Expert Tips for a Watertight Seal
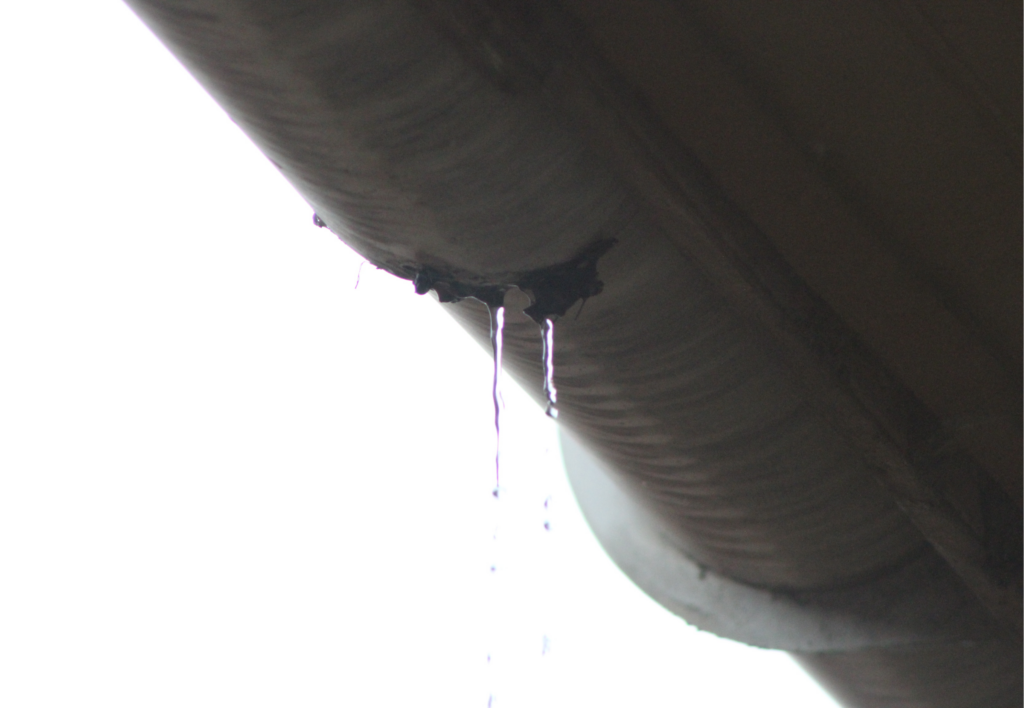
Caulking gutters is essential in maintaining the integrity of your home’s exterior. Gutters channel water away from your foundation, but when they start to leak, they can lead to water damage. Resealing gutters with caulk not only prevents water penetration but also prolongs the life of your gutter system. We ensure they are well-maintained to protect your home from the costly consequences of water infiltration.
If you notice signs of wear or a leak in your gutters, resealing with caulk is a straightforward solution. It’s an effective way to fill in gaps and holes where water can escape. We clean the gutters thoroughly and remove any old, failing sealant before applying a new bead of caulk. This guarantees a strong, watertight barrier that will stand up against the elements.
Assessing Gutter Condition
Before repairing gutters, it’s essential to perform a thorough assessment. We’ll need to identify common problems and evaluate how the gutter’s age and material may affect their current state.
Identifying Common Gutter Problems
When inspecting gutters, look for visual indicators of damage such as:
- Rust: Especially prevalent in steel gutters, rust can weaken the structure, leading to further damage.
- Gaps and cracks: Even small gaps or cracks can grow, so it’s crucial to spot and address them early.
- Holes: Can range from nail-sized punctures to larger issues, and they directly affect the gutter’s ability to channel water.
- Sag: Indicates potential problems with the gutter’s hangers or fascia boards.
Evaluating Age and Material Factors
Different materials have diverse lifespans and vulnerability to issues:
- Metal gutters (like aluminum and copper): They can last for decades but may be prone to dents and, in the case of steel, rust.
- Vinyl gutters: Less prone to rust but might become brittle and crack with age or under extreme temperatures.
Considering the age of the gutters is vital since older systems might require more extensive repair or even replacement.
Preparing for Caulking
Before applying new caulk to your gutters, ensuring a clean and dry surface is crucial. We’ll guide you through the preparation phase step-by-step for an effective caulking job.
Cleaning and Drying Gutters
First, we need to ensure the gutters are free from dirt and debris. Wearing protective gloves, carefully remove any leaves, twigs, and other debris by hand or with a small scoop. Once the larger pieces are out of the way, take a garden hose to rinse down the seams and downspout.
| Step | Tools Needed | Tips |
|---|---|---|
| 1. Remove debris | Gloves, scoop | Be thorough, focus on seams and downspout. |
| 2. Rinse gutters | Garden hose | Use a moderate water pressure to clean. |
After rinsing, check for any remaining moisture that could compromise the caulk’s adhesion. The gutters must be completely dry for the caulk to set properly, so allow sufficient drying time.
Removing Old Caulk and Debris
To create a surface conducive to new caulk, we must remove any remnants of old caulk. A chisel and wire brush can be used to scrape away old material without damaging the gutters.
| Step | Tools Needed | Tips |
|---|---|---|
| 1. Scrub seams | Wire brush | Gently brush to avoid damage. |
| 2. Remove old caulk | Chisel, putty knife | Use the tool that fits best. |
As we remove the old caulk, we need to be detailed in our approach, making sure the edges are clear and smooth. Once you’ve successfully prepped the area, the gutters will be ready for a fresh caulk application.
Choosing the Right Caulk and Tools
When sealing your gutters, selecting the appropriate caulk and tools is crucial for a durable and effective seal. Quality sealants will protect against leaks, while the right tools ensure an easy and clean application process.
Types of Gutter Sealants
Silicone Sealants: Ideal for their elasticity and adherence to a variety of materials. They come in two forms, 100% silicone or a silicone blend, both suitable for gutters.
Butyl Rubber Sealants: These are oil-based and known for their strong adhesion and durability, making them excellent for areas with severe weather conditions.
Acrylic Latex Caulks: A blend that may include silicone, offering a balance between elasticity and ease of use, a good general-purpose choice but not as durable as pure silicone or butyl sealants.
Recommended Sealants:
- 100% Silicone: Best for extreme temperatures and UV resistance.
- Silicone Blend: For slightly less severe conditions with a need for flexibility.
- Butyl Rubber: For the highest level of protection against harsh weather.
- Acrylic Latex with Silicone: For easy application and moderate weather resistance.
Tools for Caulking
Caulking Gun: A crucial tool for applying caulk seamlessly and with control. Suitable for larger cartridges ranging from 9 to 11 ounces.
Squeeze Tube: Handy for smaller projects, allowing direct application without a gun. These tubes typically hold 3 to 6 ounces of caulk.
Additional Tools:
- Ladder: To safely reach the gutters.
- Clamps: To hold the gutter pieces in place as you work.
- Screwdriver, Hammer, Putty Knife: For removing old caulk and prepping the surface.
Tool Checklist:
- Caulking Gun / Squeeze Tube
- Ladder
- Clamps
- Screwdriver
- Hammer
- Putty Knife
With the right sealant and tools on hand, we can ensure that gutters are properly sealed, protecting the home from water damage for years to come. Remember, the key to a successful caulking job is not just the product but also the precision and care with which we apply it.
Applying Caulk to Gutters
Properly applying caulk to your gutters is crucial for preventing water damage. We’ll focus on two key areas: sealing seams and joints, and addressing leaks and holes.
Sealing Seams and Joints
To effectively seal gutter seams and joints, start by making sure the area is clean and dry. Use silicone caulk, which is waterproof and easy to paint, to create a durable seal. Here’s a simple process:
- Clean the gutter seam or joint with a brush, removing any debris or old caulk.
- Cut the nozzle of the silicone caulk tube at an angle for a smooth application.
- Apply the caulk along the gutter seam or joint with even pressure.
- Use gloves to smooth out the caulk for a consistent seal.
- Allow sufficient drying time as recommended by the caulk manufacturer.
Addressing Leaks and Holes
When sealing small holes and patching leaks, the same principle of a clean, dry surface applies. Follow these steps:
- Inspect the gutter for small holes or leaks.
- Clean the affected area thoroughly with a towel or cloth.
- If the hole is large, use a gutter patching kit; for small holes, silicone caulk is sufficient.
- Apply a waterproof sealant over the area to ensure a watertight barrier.
- Again, allow the sealant to dry completely, adhering to the product’s specified drying time.
Final Steps and Curing
When caulking gutters, the correct application and allowing adequate curing time are crucial to ensuring a lasting seal that withstands the elements.
Ensuring Proper Application
To ensure proper application of the caulk or liquid rubber waterproof sealant, make sure the gutters are clean, dry, and free of debris. Apply the sealant smoothly to cover any holes, cracks, or seams, maintaining a consistent pressure to achieve the right viscosity and ease of application.
- Cleanliness: The area must be free of dirt and moisture.
- Smooth Application: Apply in a continuous bead, ensuring complete coverage.
Curing and Drying Considerations
After applying the sealant, it’s important to allow it sufficient time to cure fully. The drying time can vary depending on the product, temperature changes, and humidity levels.
- Curing Time: Typically requires 24 hours for a surface skin to form, with full curing taking up to a week.
- Temperature and Humidity: Follow manufacturer’s guidelines, as these factors can influence drying time.
Remember, a well-cured sealant will remain flexible, adapting to temperature changes while preserving the integrity of your gutter installation.
Maintenance and Prevention
Maintaining your rain gutters is crucial to preventing water damage to your home’s foundation and structure. Regular cleaning and timely repairs can save you from costly fixes in the long run.
Regular Gutter Cleaning
We recommend cleaning your gutters at least twice a year to prevent clogs, which can lead to overflow and damage to the fascia and foundation.
During cleaning, ensure to remove leaves and debris that can obstruct water flow. Also, checking downspouts for obstructions is necessary as clogged downspouts can cause gutters to overflow.
- Frequency: Biannual (Spring and Fall)
- What to Remove: Leaves, twigs, and debris
- Tools Needed: Gloves, ladder, gutter scoop or a small garden trowel, and a bucket for debris disposal.
Monitoring and Repairs
Regular inspections for signs of wear such as holes, cracks, or leaky gutters are essential. Small repairs done in time prevent larger issues. If you find any signs of leakage, applying the appropriate sealant can fix a leaky gutter.
Overlooking minor signs of damage can lead to significant water damage over time. If repairs are beyond your skill set, don’t hesitate to contact professionals.
- What to Inspect: Holes, cracks, leaks
- Repair Tools: Caulk gun, sealant, gloves
- When to Call Professionals: When damage is significant or you’re unable to make the repair yourself
By adhering to these maintenance and prevention steps, you ensure the longevity of your rain gutters and safeguard your home.
Let Us Know How We’re Doing!
Did this expertly prepared resource answer your question?
Do you have another question about home maintenance, home improvement projects, home appliance repair, or something else?
Get more information, send in questions and keep the discussion going by contacting the I’ll Just Fix It Myself company customer service team at at 1-800-928-1490 or Email us at [email protected]