
Toilet Tank Not Filling but Water Running [6 Troubleshooting Tips]

When you press the toilet handle, the wastewater is flushed away and new water rushes in from the tank. Then the toilet sits in silence for the cycle to begin again. But what do you do when everything doesn’t go according to plan? What do you do when the water runs, but the toilet tank doesn’t fill back up?
A toilet tank that doesn’t fill up despite running water is likely the result of a leaky flapper, which will need to be replaced. Other potential causes include the float being set to the wrong height, a faulty fill valve, a cracked overflow tube, or trip assembly problems. There may also be a clog in the water supply line or low water pressure.
Keep reading to learn how to identify what’s going wrong with your toilet tank and exactly how to fix it!
6 reasons your toilet tank is not filling up (even though the water is running)
As far as DIY plumbing projects go, dealing with a toilet tank that isn’t filling up is a relatively easy one. Even if you’re not particularly handy, chances are you can troubleshoot most of the potential issues and save yourself some money!
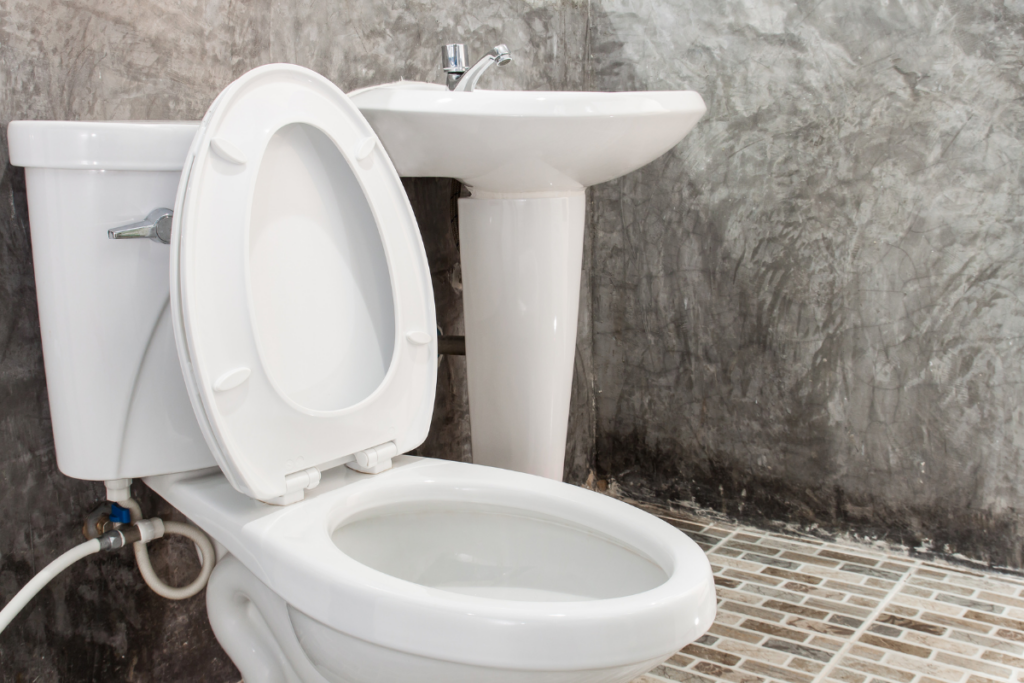
When you flush your toilet, the handle triggers the flush lever, which moves the chain, which lifts the flapper out of the flush valve seat. The water from the tank refills the bowl and the flapper returns to the flush valve seat and the tank refills. At least that’s the idea.
If the water is running but your toilet tank isn’t filling up it’s probably because of one of these potential problems:
- Leaking flapper
- Floater set to the wrong height
- Faulty fill valve
- Malfuncting trip assembly
- Faulty overflow tube
- Low water pressure
| Problem | Possible Cause | Likely Fix |
|---|---|---|
| Leaking flapper | Old flapper, debris, or flapper being too tight or loose | Replace the flapper or the trip assembly. |
| Floater set to wrong height | Low water level in the tank | Adjust the water level in the tank. |
| Faulty fill valve | Debris buildup or broken fill valve | Replace the valve |
| Malfuncting trip assembly | Malfunctioning trip lever or chain | Adjust or replace the trip assembly/handle |
| Cracked overflow tube | Disconnection between the overflow tube and the fill tube | Replace the overflow tube |
| Low water pressure | A partially closed fill valve or a rusty or leaking supply pipe | Check shut-off valve, remove debris from water supply |
Once you’re ready to start troubleshooting your toilet, remove the top of your tank and put it somewhere out of the way. Looking down, your toilet should look something like the picture below. Take a minute and familiarize yourself with the inner workings of your porcelain throne:
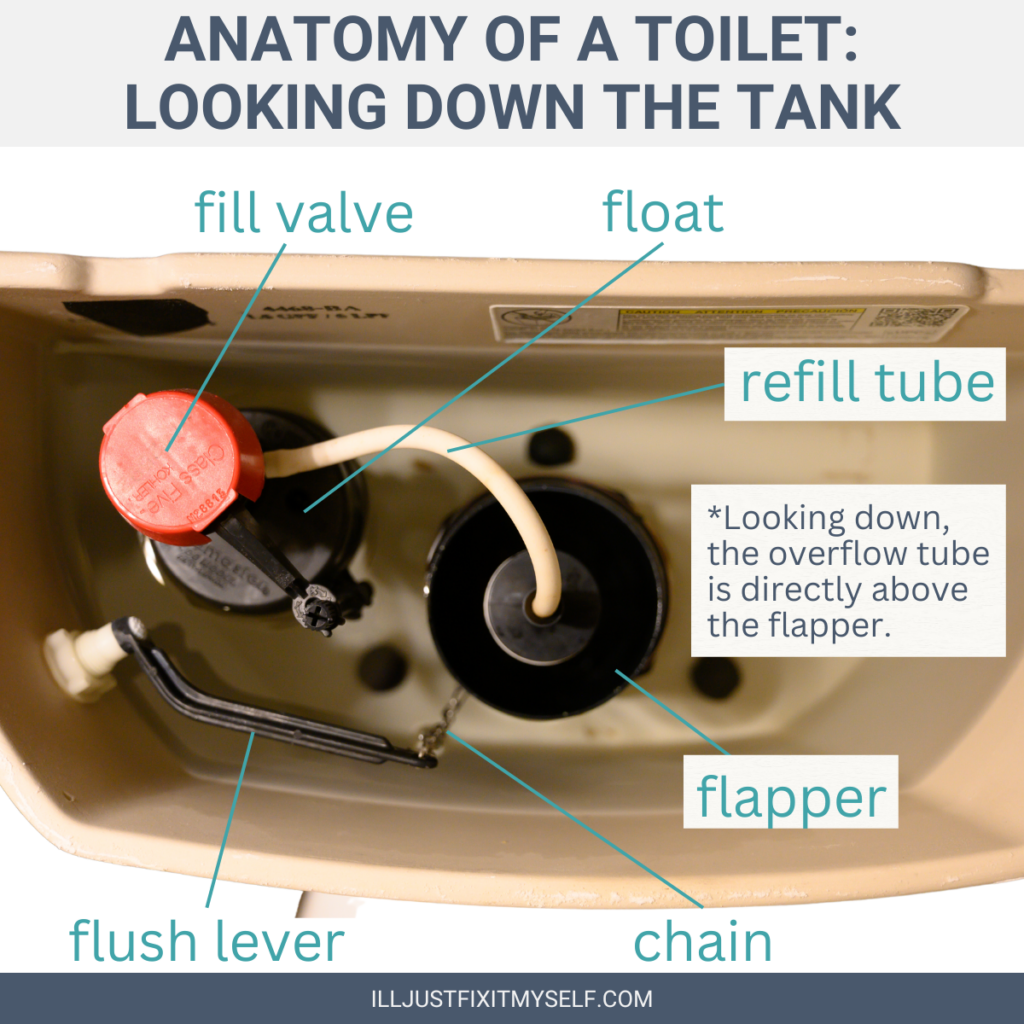
- Flush lever – The inner portion of the flush handle, the lever controls that chain and lifts the flapper to control the flow of water from the toilet tank to the bowl.
- Chain – Connects the flush lever to the flapper.
- Flapper – Seals the opening that connects the toilet tank to the bowl.
- Refill valve – Controls the flow of fresh water into your toilet tank.
- Refill tube – Carries water from the refill valve to the overflow tube and into the toilet tank.
- Overflow tube – Controls the amount of fresh water in the tank.
- Float – Prevents the inflow of water from overflowing the tank.
Now you’re ready to figure out why your toilet tank won’t fill up!
Leaking flapper
The flapper creates a watertight seal between your toilet’s tank and bowl.
A flapper may fail to create a watertight seal if there is debris blocking the connection between the flapper and the flush valve seat, the chain is too short to allow the flapper to rest completely in the seat, or the flapper is worn out.
| Possible Causes of a Leaking Toilet Flapper | Solutions |
|---|---|
| Chain too short for proper sealing | Adjust chain length |
| Debris keeping the flapping from sealing | Remove debris |
| Flapper is worn out | Replace flapper |
The fixes for all of these problems are relatively simple, but you’ll first need to figure out exactly what the problem is.
Chain too short for proper sealing
The toilet chain connects the flush lever to the flapper. If the chain is too long, your toilet may not flush completely.
A toilet chain that is too short or has become tangled will prevent the flapper from being able to reach the valve seat.
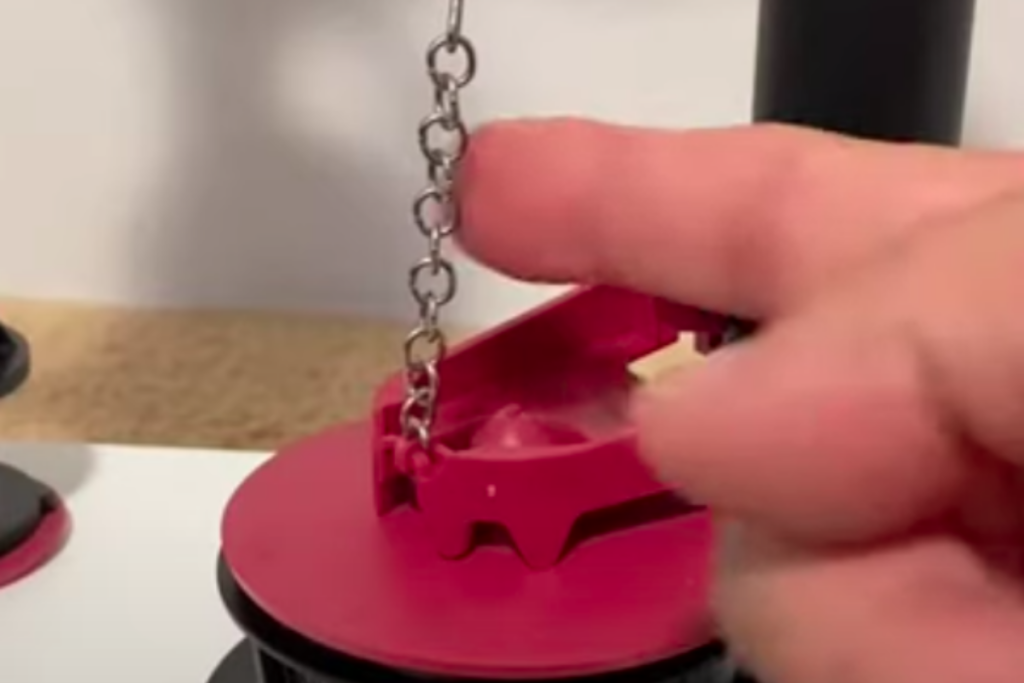
Even a small gap may be enough to keep the toilet tank from filling up completely.
How to fix a too-short toilet chain
Once you’re looking down at the inner workings of your toilet, checking and fixing the chain is so straightforward that it hardly even qualifies as a DIY project!
Examine the toilet chain. Any kinks or tangles in the chain may be enough to keep the toilet from flushing properly.
Unless you’re dealing with a new installation or have always had an issue with the toilet tank not refilling, simply running your fingers down the chain will probably be enough to get your chain back in working order.
Top tip: It’s perfectly safe to put your hands in the back of the tank. The tank may be discolored from water sitting in it, but the water itself is just as clean as the water that comes out of the sink.
Debris keeping the flapping from sealing
If you didn’t find any issues with your toilet chain, go ahead and reach down to the flapper and feel around.
While getting debris in a closed toilet tank is unlikely, check for any obstructions that may be keeping the flapper from creating a watertight seal with the valve seat.
You may that the chain is actually too long and is slipping under the seal, that the flapper has begun to disintegrate from age, or that something has been dropped into the toilet tank without your knowledge.
How to fix a Blocked flapper
Depending on what’s keeping the blocked flapper from creating a seal, you may be done or this may be the first step in your DIY journey.
Once you’ve determined what is causing the blockage, remove it.
Prevent the blockage from recurring by ensuring the chain is the correct length or replacing the damaged flapper.
Flapper is worn out
The last reason your flapper may be leaking is that it is simply no longer able to create the necessary seal.
A damaged or worn-out toilet flapper will not be able to create a watertight seal between the toilet tank and the bowl. This will create a constant leak and cause the toilet tank to continue filling.
In this case, you’ll need to replace the flapper.
You might be interested in: American Standard Toilet Flapper Problems (4 Issues Fixed)
How to replace a leaky toilet flapper
Replacing a toilet flapper may sound like a big deal, but the most time-intensive part of the project is likely to be making the trip to your local hardware store.
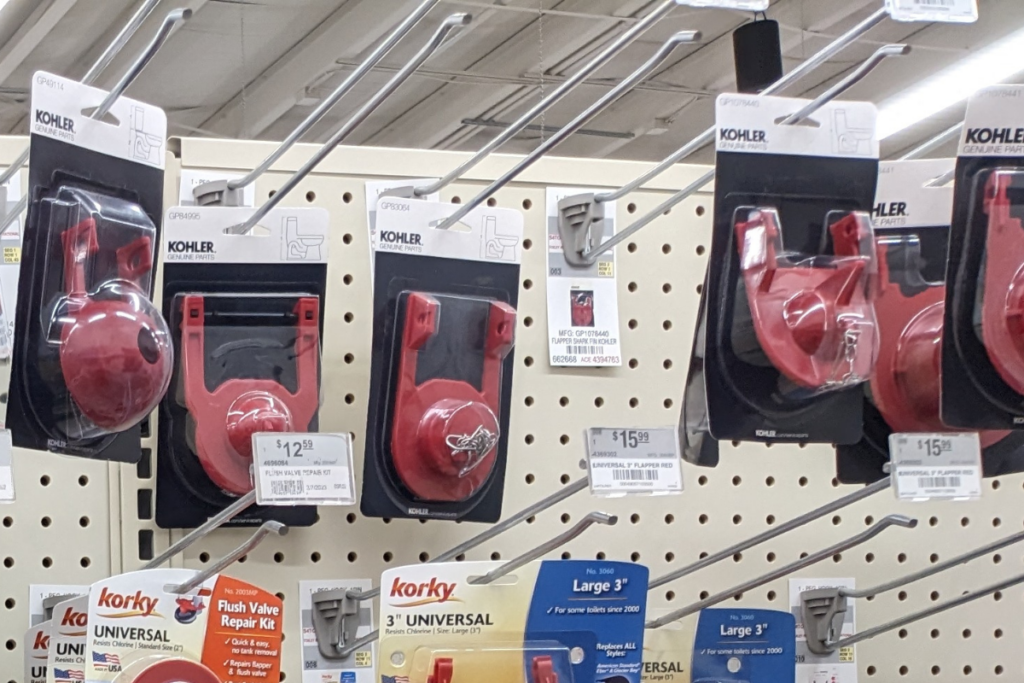
To replace the flapper on your toilet:
- Buy a replacement. Normally I’m a fan of generic replacement parts, but if you’re not ready to customize the generic part to fit your toilet, try to find one of the same brand as your toilet.
- Remove the tank lid. The lid is heavy porcelain and will break if dropped (and probably break something else in the process) so put it somewhere safe and out of the way. I usually just put it down inside the bathtub.
- Turn off the water to your toilet. There should be a valve either directly behind your toilet or at the wall. Rotate it clockwise until you can’t turn it anymore. Flush the toilet to test; with the water off, the tank will not refill.
- Disconnect the chain from the trip lever. The trip lever is the long plastic bar that extends from the back of the handle. Take note of which hole the chain connects to.
- Remove the old flapper. Lift the flapper off the side pegs. If your flapper is hard plastic rather than rubber, it may take a little more work but it shouldn’t be a struggle.
- Customize the flapper. If you opted for the generic flapper, follow the instructions on the package to prepare it for your toilet.
- Install the flapper. Insert the new flapper and ensure that it is connected the same way the previous one was.
- Attach the chain. Connect the chain to the same hole you noted earlier. This controls how high the flapper lifts when you flush.
- Turn the water back on. Turn the water shutoff valve counterclockwise. It should go all the way until you can’t turn it anymore.
- Test. Flush the toilet, observing the bowl. It should drain completely and then stop running once the tank is full. Once everything is working properly, put the lid back on.
Six reasons your toilet flapper may still be leaking after it’s replaced.
Floater set to the wrong height
The floater (also called a ballcock or float valve) prevents the toilet tank from overflowing. As the water refills, the floater rises, pushing the float arm to close the valve and stopping any more water from entering the tank.
A floater that is set too low will stop the water from completely filling the tank.
Conversely, a floater that is set unnecessarily high will waste water as each flush will use more water than is needed.
How to fix a toilet floater that is set to the wrong height
The float controls the flush, but it can also cause the toilet to run continuously (too high) or the tank to not fill up entirely (too low).
The first step to identifying your toilet’s float is identifying it. The float is on the same side of the toilet as the flush handle and moves up and down along a pipe when the toilet is flushed.
To adjust the height of your toilet floater:
- Remove the tank lid. The lid is heavy porcelain and will break if dropped (and probably break something else in the process) so put it somewhere safe and out of the way. I usually just put it down inside the bathtub.
- Turn off the water to your toilet. There should be a valve either directly behind your toilet or at the wall. Rotate it clockwise until you can’t turn it anymore. Flush the toilet to test; with the water off, the tank will not refill.
- Inspect the float’s height and determine how much water you need to adjust.
- Hold the lever arms down and locate the floater screws. Turn the screws counter-clockwise to lower the water level in the tank. The float should sit about half an inch just below the overflow tube.
- Turn the water back on. Turn the water shutoff valve counterclockwise. It should go all the way until you can’t turn it anymore.
- Test. Flush the toilet and watch the tank fill up.
Faulty fill valve
The fill valve inside the tank carries water from the water pipe into the tank after flushing. Every time you flush, the bigger fill valve at the tank’s bottom releases water into the toilet bowl, while the smaller valve at the top opens for a water refill.
As a fill valve wears out, it will no longer function properly. The upper valve may allow too much or too little water into the tank, while the lower fill valve may not seal properly, allowing water to seep into the toilet bowl.
Apart from that, the accumulation of debris can render your fill valve useless. It blocks water flowing into the toilet tank and creates low water pressure.
How to fix a faulty fill valve
Unless you can determine that there is debris blocking the fill valve, chances are it’s time to install a new one. Good news! This is another fairly simple DIY repair.
To replace a fill valve on your toilet:
- Buy a replacement. You should be able to find a generic fill valve that matches your toilet.
- Remove the tank lid. The lid is heavy porcelain and will break if dropped (and probably break something else in the process) so put it somewhere safe and out of the way. I usually just put it down inside the bathtub.
- Turn off the water to your toilet. There should be a valve either directly behind your toilet or at the wall. Rotate it clockwise until you can’t turn it anymore. Flush the toilet to test; the tank will not refill with the water off.
- Remove the old fill valve. Lift the fill valve off the base.
- Install the fill valve. Remove the new fill valve from the included base (if you observe damage to your existing base, you’ll need to replace that as well). Slide it onto the base inside the tank and snap it into place.
- Insert the refill hose into the overflow tube. The refill tube should not go below the water line.
- Turn the water back on. Turn the water shutoff valve counterclockwise. It should go all the way until you can’t turn it anymore.
- Test. Flush the toilet, then observe how long the tank takes to refill.
Malfuncting trip assembly
The trip assembly connects the inside of the tank to the flush handle. If this component malfunctions, your toilet will not flush correctly, and the toilet tank will not fill as required after flushing.
The trip lever controls how high the chain lifts the flapper from its seat. If the trip lever is damaged, it could cause the flapper to stay open.
Inspect the trip assembly to determine if it’s damaged or simply not connected properly.
Top tip: The trip assembly is controlled by the handle. Check out this article if your toilet has a button flush.
How to fix a malfunctioning trip assembly
A damaged trip assembly likely means replacing the entire toilet handle as well as these tend to be connected.
To replace a toilet handle and trip assembly:
- Buy a replacement. Compare the size of the replacement handle with your existing one. Either purchase a replacement handle kit from the toilet manufacturer or find an interchangeable generic option.
- Remove the tank lid. The lid is heavy porcelain and will break if dropped (and probably break something else in the process) so put it somewhere safe and out of the way. I usually just put it down inside the bathtub.
- Disconnect the chain from the trip lever. The trip lever is the long plastic bar that extends from the back of the handle. If your toilet isn’t flushing, chances are this piece has broken off of the handle and is lying at the bottom of the tank. Take note of which hole the chain is connected to.
- Unscrew the flush handle. Hold the handle firmly and unscrew the plastic nut on the inside of the tank. You will probably be able to do this without a wrench.
- Remove the broken flush handle. Ensure that the exterior handle, the nut, the washer (this should be between the nut and the porcelain), and the trip lever are all removed from the toilet tank and thrown away.
- Insert the replacement handle. Remove the plastic washer from the handle. Insert the handle through the front of the toilet so that the trip lever extends into the toilet and sits several inches directly above the flapper.
- Connect the handle. Slide the washer down the length of the trip lever so it is against the interior of the tank. Slide the nut next and twist it on. This should be snug, but over-tightening can crack the porcelain.
- Attach the chain. Connect the chain to the same hole you noted earlier. This controls how high the flapper lifts when you flush.
- Test. Flush the toilet, observing the bowl. It should drain completely and then stop running once the tank is full. Once everything is working properly, put the lid back on.
Cracked overflow tube
The overflow tube prevents the toilet from overflowing. It acts as a backup for the floater and ensures that you don’t end up with water all over the bathroom floor.
A cracked overflow tube may drain water too much water from tank and prevent the toilet from filling up.
A cracked or damaged overflow tube may also not work properly and may lead to the toilet overflowing.
How to fix a cracked overflow tube
A damaged overflow tube will need to be replaced. The good news is that most replacement parts are relatively inexpensive. It is, however, a slightly more difficult fix than others discussed so far.
To replace the overflow tube on your toilet:
- Buy a replacement. Most overflow tubes are generally the same but try to match the brand and model of your toilet if possible.
- Remove the tank lid. The lid is heavy porcelain and will break if dropped (and probably break something else in the process) so put it somewhere safe and out of the way. I usually just put it down inside the bathtub.
- Turn off the water to your toilet. There should be a valve either directly behind your toilet or at the wall. Rotate it clockwise until you can’t turn it anymore. Flush the toilet to test; with the water off, the tank will not refill.
- Dry out the tank. Use a towel to sop up as much water as possible from the inside of the tank.
- Remove the tank. Use a flathead screwdriver and a 7/16″ wrench to disconnect the tank. Remove the supply line.
- Disconnect the chain from the flapper.
- Remove the old overflow tube. Remove the rubber seal and set aside. Remove the large plastic nut from the bottom of the tank and lift the upper portion of the overflow tube out of the tank.
- Install the new overflow tube. Insert the top of the overflow tube into the tank and through the hole in the base. Hand-tighten the large plastic bolt that secures the overflow tube to the tank. Replace the existing rubber seal that separates the tank and the bowl.
- Replace the tank. Use your screwdriver and wrench to reattach the tank to the base. Reconnect the supply line. Reattach the chain to the new flapper.
- Turn the water back on. Turn the water shutoff valve counterclockwise. It should go all the way until you can’t turn it anymore.
- Test. Flush the toilet, observing the bowl. It should drain completely and then stop running once the tank is full. Once everything is working properly, put the lid back on.
Low Water Pressure
Professionals suggest a fully functional toilet tank should take 30-60 seconds to refill. If it takes longer, you could be staring at a low water pressure problem, which will prevent the toilet tank from filling even with a non-stop supply of water.
Low water pressure may prevent the toilet tank from filling completely or in the expected amount of time. Water pressure may be restricted when the shut-off valve is partially rotated, or if there is debris in the water supply.
Check the water pressure in your home. If the water pressure problem is widespread, it’s unlikely that troubleshooting your toilet alone will help.
How to improve water pressure to your toilet
A toilet that takes too long to refill may not seem like a problem at first, but you’ll definitely wish you dealt with it sooner when people start coming over!
To improve the refill time of your toilet’s tank, you should:
- Entirely turn on the shut-off valve to increase the water pressure.
- Ensure the canister or flapper seat is properly seated after every flush.
- Clean the seat washer/fill valve seat or fill valve inlet to remove debris.
- Make sure your water supply is free from debris.
If this doesn’t help, it may be worth contacting a professional to determine if there is a leak in your water line.
Summary of Troubleshooting a toilet tank that is not filling up
If your toilet tank isn’t filling even after you’ve confirmed that the water is running, you may be facing one of these six problems:
- Leaking flapper
- Floater set to the wrong height
- Faulty fill valve
- Malfunctioning trip assembly
- Faulty overflow tube
- Low water pressure
A little bit of troubleshooting will quickly determine which of these causes is the most likely culprit.
No matter your DIY prowess, the flapper, the floater, the fill valve, and the trip assembly are bound fairly easy fixes.
Let Us Know How We’re Doing!
Did this expertly prepared resource answer your question?
Do you have another question about home maintenance, home improvement projects, home appliance repair, or something else?
Get more information, send in questions and keep the discussion going by contacting the I’ll Just Fix It Myself company customer service team at at 1-800-928-1490 or Email us at [email protected]
